2014 License Plate Renewal

“Thank you for renewing your license plates online with the Illinois Secretary of State.”

Fee For This Transaction
Renewal Fee : $114.00
Payment Processor Fee : $2.25
Total Fee : $116.25

Next year I’m going to look at getting “Expanded-Use Antique” plates, which are cheaper to renew.
http://www.cyberdriveillinois.com/departments/vehicles/license_plate_guide/antiqueexpand.html

Front, Rear and Trunk LEDs!

By now, the basics of LEDs are well known: longer life, faster light up time, and reduced power consumption. Many Delorean owners are converting their incandescent bulbs to LEDs for all of these benefits. One really well written blog entry on Delorean LED conversion and benefits can be found here:

http://delorean2109.blogspot.com/2011/07/going-100-leds-on-your-car-is-good-idea.html

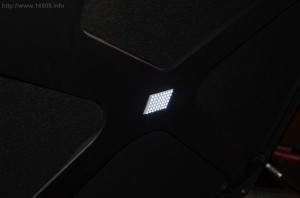
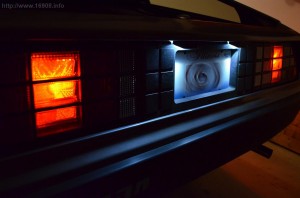
I saw someone else used these 48 LED SMD Panels as a trunk light. I liked the look, and had a few panels left over. This is a big improvement in brightness over the incandescent festoon bulb, and my later LED festoon bulb:
DSC_0626DSC_0622

I should have probably bought bigger brake lights, but after testing, these 42 LED bulbs were deemed just as bright as the incandescent brake lights. I purchased amber colored LEDs for the turn signals, however I was disappointed that the turn signals were dim. I decided to replace them with some bigger white LEDs.
DSC_047720131227_144234

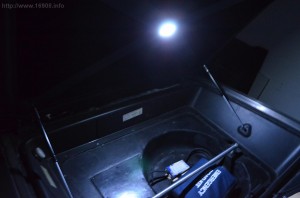
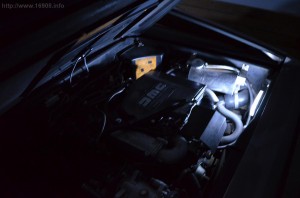
I added a 48 LED SMD Panel to the engine bay light as well:
DSC_0621

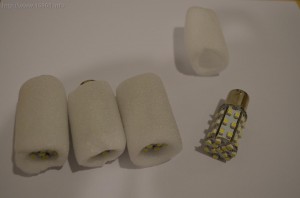
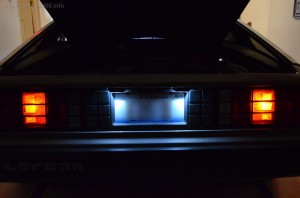
I reclaimed the LED festoon bulbs from the trunk, engine bay, and interior lights. I used two of them in the rear license plate lights. I like the white color they produce, compared to the dim, yellow-ish light.
DSC_0139DSC_0140

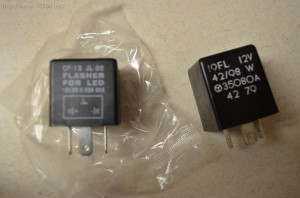
The flasher relay I purchased wasn’t set up correctly for what the Delorean needed. Swapping some relay pins with some jumper wires was a quick and easy fix. New flasher (left), old flasher (right):
DSC_0517

Using the same 12 volt battery for my testing, I measured the amperage of the lights I removed, and the new LED lights. Here’s the breakdown:

Light Application Quantity Used Incandescent Amps LED Amps Amperage Savings
Back Turn

2

2

0.26

3.58

Back Running

2

0.57

0.25

0.64

Back Brake

4

2

0.16

7.36

Back Reverse

2

2

0.31

3.38

Front Running/Turn 1st Contact

2

0.46

0.1

0.72

Front Running/Turn 2nd Contact

2

1.71

0.29

2.84

License plate

2

0.42

0.03

0.78

Trunk Light

1

0.73

0.21

0.52

Engine Bay Light

1

0.73

0.21

0.52

Rear Dome

1

0.42

0.42

0

Front Dome

1

0.42

0.1

0.32

Total:

20.56

Now all these lights aren’t lit at the same time, so the savings isn’t always over 20 amps. However, I have significantly reduced the load on the electrical system. Maybe my alternator will live a little longer.

Costs:

Item Location Qty Vendor

Cost

Shipping

Total

Flasher Relay Under Dash, drivers side

1

Ebay

$ 2.79

$ 1.70

$ 4.49

1156 BA15S 68 SMD Amber / Yellow Tail Fog Turn Signal 68 LED Car Light Bulb Lamp Rear Turn Signal

2

Ebay

$ 6.92

$ –

$ 6.92

1157 BAY15D 102 SMD Pure White Brake Tail Turn Signal 102 LED Light Lamp Bulb S Front Indicator, turn signal

2

Ebay

$ 8.92

$ –

$ 8.92

1156 BA15S 102 SMD Pure White Tail Signal Turn 102 LED Car Light Lamp Bulb 12V Reverse

2

Ebay

$ 9.92

$ –

$ 9.92

1156 BA15S P21W 3528 SMD 44 LED Bulbs Light Lamp CANBUS Anti Sans S0BZ Rear Running

2

Ebay

$ 9.92

$ 1.55

$ 11.47

1156 Tail Brake White 42 SMD LED Light Bulb Lamp Brake Lights

4

Ebay

$ 2.00

$ 7.38

$ 9.38

48 SMD LED White Panel Light Trunk Light

1

Ebay

$ 3.03

$ 0.40

$ 3.43

48 SMD LED White Panel Light Engine Compartment

1

Ebay

$ 3.03

$ 0.40

$ 3.43

LED Festoon bulb License Plate Lights

2

On Hand

$ –

Total:

$ 57.96


Unused:
Item Location Quantity Vendor

Cost

Shipping

Total

1156 BA15S 68 SMD Amber / Yellow Tail Fog Turn Signal 68 LED Car Light Bulb Lamp Rear Turn Signal

2

Ebay

$ 6.92

$ –

$ 6.92

New(er) Taillight housings

My taillights were cracked, and dull from a decade of neglect and abuse in the hot Georgia sun. The removable piece from one taillight was even melted from a bulb!?!?
DSC_0014 DSC_0017
DSC_0015DSC_0009
   DSC_0016
I had become jealous of the glassy, perfect appearance of the taillights on other Deloreans. So I found a good deal on some used, but good condition taillight housings. They don’t appear faded, and only have light surface scratches:

Newer taillights before cleaning:
DSC_0004DSC_0005

To clean them, I would fill them with hot water, and drain them, removing all the dirt and bugs.
Cleaning Tip: You can clean all the grooves between the lenses with an old toothbrush, which should not scratch the plastic.

After a soap and water cleaning, they looked better. Some light surface scratches visible
DSC_0007 DSC_0006

After some buffing with Meguiar’s PlastX, any dirt has now been removed, and the scratches are gone. They really pop!
DSC_0026DSC_0025DSC_0024

The polish really removes any deep dirt. The white terrycloth towel used to be clean.
DSC_0032

Old housings on the left, newer on the right:
DSC_0028DSC_0029

With new taillight housings costing $300, I saved some money, and I’m very happy with the results. As for my previous taillight housings, I might try to sand off any imperfections, and black them out. That should cover up the cracks. If they turn out nice, I would swap housings whenever I felt like it.

Costs:

Item Vendor

Cost

Tax

Total

(2) Used Taillight housings Withheld

$ 150.00

$ 11.63

$ 161.63

Meguiar’s PlastX Clear Plastic Cleaner and Polish Amazon.com

$ 5.97

$ –

$ 5.97

Total: 

$ 167.60


Preventative Maintenance – Roof Box Separation

The steel roof structure that holds the torsion bars is glued to the top of the fiberglass. This is prone to separating over time, and distorting due to the forces of the torsion bars. After removing the “rear screen upper finisher” you can see the steel roof structure covering the fiberglass above the rear window:

20131230_155053

There are a few ways to secure this, and I chose a simple method. I secured the roof structure to the fiberglass on the back of the car, above the rear window with some stainless sheet metal screws.

20131230_160849

Drilling:
20131230_160017

I also covered the screws in RTV sealant, before screwing them in, to keep water out. That’s probably overkill, but it was on hand and took a minute.

20131230_164051 20131230_164102

Costs:

(4) Stainless Sheet Metal Screws: $2.80 @ Ace Hardware

Joliet Correctional Center Photo Shoot

One of my favorite films is The Blues Brothers (1980). About 20 minutes south of my home, is the now closed Joliet Correctional Center, or more commonly, “Joliet Prison.” The prison was used during the intro to the Blues Brothers, and today, is a great place to photograph. Wikipedia has a great entry on the prison here. I always wanted to get a good picture of the gate from which Jake emerges in the beginning of the film.

bb1

So why not bring my Delorean to the prison to fill in for the Bluesmobile? Yeah, it doesn’t make any sense, but the pictures turned out great.

elwood3

A rare picture of me:
elwood

DSC_1058DSC_1061 DSC_1062

Door Lock Wedgectomy

I came across instructions on the internet for performing a “wedgectomy” on the locks, which involves grinding off a plastic wedge from the door latches. With the wedge in place, the doors can’t be locked while open. Trying to lock them while open will put force on the linkages, possibly throwing them out of adjustment. A latch without a wedge can be safely locked while they’re open.

Since I have remote lock/unlock, there’s always a chance I might bump the lock button while the doors are open. My door panels were currently off due to maintenance and repair. My latch and lock linkages also needed adjusting, so I decided to perform the wedgectomy.

20130809_221538 20130809_235419 20130809_22523120130809_235937 20130809_230506

Removing each latch is not easy! I spent a few hours reorienting and finally removing them from the doors. I took many pictures of the linkages so I could put everything back together correctly. Once the latches are out, performing the wedgectomy is fairly easy with a rotary tool and a burr grinding bit. I also got the chance to clean all the latches, and lube them up with lithium grease. Sorry, I didn’t get any pictures of the actual wedge, or it’s removal. Reinstallation is even more difficult due to adjusting the linkages.

After I reinstalled all the cleaned and updated latches, testing was successful!

Costs:
Lithium Grease: $3.99

Side Mirrors Repaired

Ever since I bought 16908, the driver’s side mirror has been wobbly. Someone previously took the bottom cover off the mirror, and tried repairing it. They didn’t, and the plastic cover was lost.

I was able to disassemble it, bend the compression washers, and stiffen up the mirror. I also cut a new piece of plastic to cover the inside of the mirror, and used RTV to secure it.
20130708_193201
The passenger side mirror has never been able to move on its vertical axis. Luckily the electrical connections were dirty, after just needed to be scuffed up to restore power to the motor.

My driver’s side convex mirror glass position needed to be corrected. I removed it, and reattached it with some 3M molding tape.
20130708_193217
 For the first time since I’ve owned the car, I have two perfectly working side mirrors!

Costs:

Item Vendor

Cost

Tax

Total

Molding Tape Advance Auto Parts

$ 6.99

$ 0.58

$ 7.57

Kneepad Maintenance

My previous owner had the passenger side kneepad recovered. However, the wrong vinyl was used, and the recover job didn’t turn out very well. I’ve grown to dislike the kneepad over the years, so I located a used kneepad in good condition:
DSC_0578
DSC_0580
DSC_0582
DSC_0581

It has the right pebble texture, and the ripples in the vinyl. It’s a little worn and sun-faded, but I planned to re-dye it anyway since it needs to be black.

My other kneepads were loose, and they had to come out when I replaced my steering column. I also gave them a good cleaning before re-dying them. It turns out, they were disgustingly filthy! Lots of dirt, possibly from when the car was abandoned many years ago.

Dying the kneepads and door panels:
20130531_224857

Passenger kneepad dyed:
DSC_0585

I think they turned out well:
DSC_0598

DSC_0609

DSC_0608
I plan to sell the recovered kneepad, and “recover” some money. With these kneepads, now I feel I need to recover or replace the dash, binnacle, and A-pillars.

Item Vendor

Cost

Used Passenger Side Kneepad  

$ 90.00

SEM Landau Black Color Coat Summit Racing

$ 9.95

Total:

$ 99.95

New Seatbacks

My seatbacks were broken. The vinyl was torn, scuffed, worn, ripped, patched, and disintegrating. Even the staples for the material were rusted. I decided to try and make some new ones.
DSC_0600

DSC_0592

DSC_0593

DSC_0590

Tools Used:
Jig Saw
Sharpie Marker
Dremel or Rotary Tool
Drill, drill bits, countersink
Disposable Paint Brush
Rivet Tool
Scissors
Razor blade
Heat Gun

Supplies:
Vinyl
Hardboard
Contact Adhesive
Rivets

I drilled out the rivets on my old seatbacks, and reclaimed the brackets. I marked the position of all the holes with an old seatback. After drilling the holes, I riveted on the brackets. I then spread on some contact adhesive and let it tack up. Then I warmed up the vinyl with my heat gun, stretched it and attached it to the board. Finally, some trimming with a scissors and razor.
DSC_0588

DSC_0591

DSC_0594

DSC_0595

DSC_0596
Marking the holes for the screws was the hardest part:
DSC_0601

DSC_0602

DSC_0604

The passenger side came out great!. Unfortunately the driver’s side is sub-par, and will need to be recovered at some point. For now, it’s still a huge improvement.

Costs:

Item

Vendor

Cost

Tax

Total

Dap Weldwood Contact Cement

Home Depot

On Hand

Disposable Paint Brush

Home Depot

On Hand

Black Shang Vinyl

Hancock Fabrics

$ 9.49

$ 0.59

$ 10.08

4′ X 4′ Hardboard

Menards

$ 4.79

$ 0.41

$ 5.20

Rivets

Home Depot

$ 5.24

$ 0.43

$ 5.67

4 Screws, 4 Nylon Washers

Ace Hardware

$ 2.12

$ 0.16

$ 2.28

Total:

$ 23.23