New DeLoreans?

So the LA Times ran an article with an interview with James of DMC (Houston):

http://www.latimes.com/business/la-fi-garage28jul28,0,7786124.story?coll=la-home-center

The article mentions DMC (Houston) will be building new cars. I believe James has mentioned in the past they’ll need to make new fiberglass underbodies since their supply is low. I believe this means new VIN tags. Which translates into “New DeLoreans.” This caught the attention of several other news outlets including Slashdot:

http://slashdot.org/articles/07/07/29/1259202.shtml

Get ready to read several hundred flux capacitor, 1.21 Gigawatts, plutonium, and cocaine jokes, and several other comments about how the car was a poor performer and all around disaster. Nothing that hasn’t been beaten to death before.


There are many DeLoreans available in any condition – just check ebay, and the for sale listings on various DeLorean websites. If you want one, you can find it. I believe the market for new DeLoreans would be minimal, and a DMC (Houston) refurbished DeLorean is completed mostly with news parts anyway. I don’t think we’re going to see “New DeLoreans” anytime soon.
 

DMCTalk.com has a good discussion going on this topic: http://www.dmctalk.com/showthread.php?t=6597


Still, I’ve had several people over the last few days say they’ve heard about the new DeLoreans coming soon. Whatever.

Door Pull Strap Repair

My driver’s side door pull strap came apart where the loop is sewn together. My 83′ model has the straps incorporated into the door panel. Since I already had the door apart for the door launchers, and to adjust the linkage, the break happened at a good time. The strap looks original, and is made from leather that is folded a couple times. Needless to say, I couldn’t repair it myself.

At the suggestion of my mom, I went to a local shoe repair store. The clerk wanted to know what it was, and I explained it was the pull strap for the door in my DeLorean. He was really nice, and didn’t make any jokes or stupid comments. He explained the stitching would probably give out again after some use. He sewed several rows of stitches back into the strap, which seems a lot better than what was there. Best of all, it took less than 10 minutes, and didn’t cost a fortune. I’ll definitely go back there if I ever need my shoes repaired.

Leather Pull Strap repair stitching – $5 at Woodridge Shoe Repair

(Sorry, no pics)

Modification to Air Conditioner Control Panel Lighting

The air conditioning instrumentation is constantly lit up. Here’s a good question: Why?

The light bulbs behind the instrumentation throw off a lot of heat, and I’ve heard horror stories or people’s control panels melting. Luckily there’s a simple fix:

http://www.dmcnews.com/Techsection/acpanellites.htm

I’ve also heard about people grinding a prong off the relay, but I decided against that. My first attempt at creating the needed wire wasn’t great since I don’t have good wire crimpers. Then I bought a spare fuel pump relay from SpecialTAuto.com and got a jumper with thicker gauge wire, with spade connectors already crimped. It’s meant for the fuel pump relay in case it goes out, but I decided to use it in this application.

Cost:

Free with Fuel Pump Relay at SpecialTAuto.com.

DeLorean Newbie changes the oil

Why blog about an oil change? It’s just an oil change, right? Wrong! This is my first time performing an oil change with The D, and only my second time ever performing an oil change!

Story: Someone I know went to a 10-Minute type oil change place. They forgot to put the drain plug back in. The person paid, drove off, and the engine seized. Result: 10-Minute type oil change place had to pay for a new engine and installation. But then, maybe if this happened to me, I could get the oil change place to buy me a Stage II Engine from DMC (Houston)….

Story: A 10-Minute type Oil change place once wanted to charge me $50 for an oil change. Why? They added a synthetic oil charge. I didn’t ask for synthetic oil. When I complained, they removed the charge. Did they fill my car with synthetic oil? They didn’t say they did, and I never figured that out. Why am I telling this? I don’t want to be overcharged, and I don’t want synthetic oil in The D.

Fact: 10-Minute type oil change places will try to get you to buy other consumables at an inflated cost. New air filters, light bulbs, washer fluid, etc. This stuff is inexpensive, and easy to replace yourself. I once had a 10-Minute type oil change place try to sell me a replacement brake light. I declined, and later discovered my bulb wasn’t even burned out. I never went back there again.

Fact: You can’t choose from different brands of oil and filters at a 10-Minute Type Oil Change Place. I don’t want cheap oil and cheap filters. I want quality Castrol GTX oil, and Bosch filters.

Anyway, as the saying goes, if you want something done right, you should do it yourself. After some research on the DML and DMCTalk.com, I’m ready to attempt my first oil change with The D.

Mileage: Almost 26K, probably just around 3K since the last change. Previous owner used 10w 40, and didn’t use a copper crush washer on the drain plug. I’m going to be using 20w 50 for the hot summer weather, and also at the recommendation of DMC (Midwest).

Ramps. I’ve read about people backing their car onto ramps without problems. I’ve driven up the ramps on my daily driver, but never backed up them. After a few tries, I nailed it.

(Camera wasn’t charged, so I used the Treo)

I’ve heard about people covering their frame with aluminum foil to prevent oil spilling all over. People even suggest creating a channel for the oil to guide it into your pan. Sounds like a good plan.

I have the stock drain plug, which has an 8mm square hole in it. Huh? I don’t have a tool for it, and most DeLorean owners just make their own tool for the plug. I went to hardware stores, but couldn’t find any 5/16th key stock to make a tool for the hex head. I eventually settled on an 8mm hex key from Menards. I then took a dremel tool with a grinding bit to grind the end of it into a square. The key now fit into the drain plug perfectly. I still couldn’t budge the damn thing. I used a hammer to aid my effort, and eventually knocked it loose.

Oil!

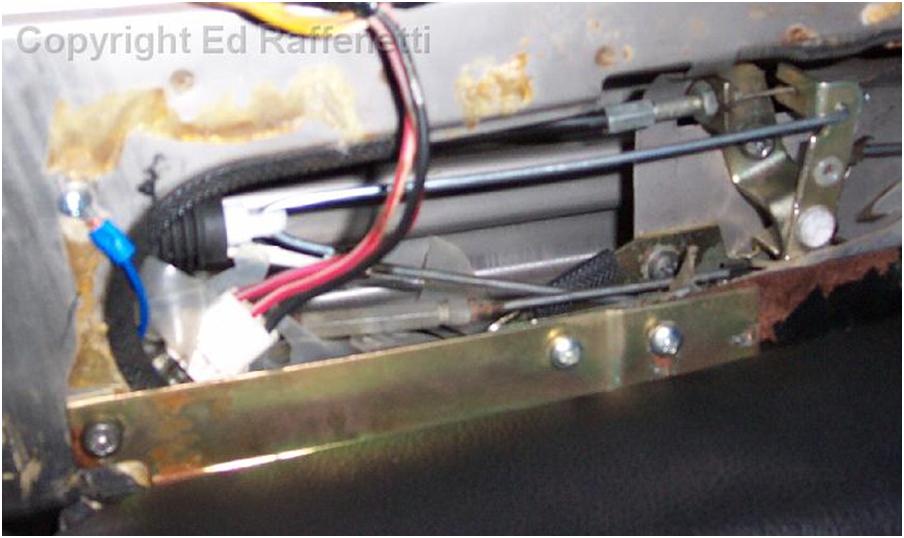
I had already ordered a replacement drain plug. I didn’t want to worry about finding the tool for the drain plug for each oil change, and I’d much rather use a socket and ratchet to remove the plug. I decided on a stainless steel drain plug with an external 17mm hex head. I skipped the magnetic one, in favor of stainless since it fits with the theme of the car. I couldn’t use the ratchet on it at first since the frame is close to the plug. I ended up using a crescent wrench to get it started. I’ll have to buy a simple flat open-ended 17mm wrench for next time. I’m also glad I ordered a replacement plug, since it looks like my stock plug has seen better days:

You can’t see it, but the hex key has been squared off

I bought a new covered drain pan to catch the oil. It works great since it’s hard to spill, and when you accidently drop the hot drain plug, it stays separate from the oil.

I wrapped the frame in foil where the filter sits. I cleaned off the old oil filter, and was able to remove it with my hand. I filled the new Bosch filter with some oil, rubbed oil on the gasket, and installed it. Went on smoothly.

I added about 6.5 quarts, and started the car. Drove it down the ramps, and checked the level. I added more oil to get the needed level. Everything looks good.

Notes

-I painted my garage earlier this year with an epoxy paint. After two oil changes, I can definitely say the floor paint was worth the money and effort. Seemingly inevitable oil spots/spills clean up very easily, and won’t stain your concrete.

-The gallon containers of oil are nice. They cost less than 4 individual quarts, they have level markings showing where a quart is, and you can reuse them for recycling your old oil.

-It took me less than 2 hours to change the oil. It probably took more time to write up this blog entry.

Supplies/Costs

One-time:
Ramps: on hand ($25 – $30 at Meijer?)
8mm Hex Key: $1 at Menards
Dremel Tool to grind down hex key: on hand
Hammer to hit Hex key to knock drain plug loose: on hand
Stainless Drain Plug: $12.95 SpecialTAuto.com
Covered 15 QT Drain Pan: $8.88 Advance Auto Parts
Funnel: on hand (one from a funnel set purchased in a dollar store?)

Consumables:
(2) 1 Gallon Castrol GTX 20W50 Oil: $11.38 from Advance Auto Parts (about 1 QT left over)
Bosch Oil Filter: $6.95 from SpecialTAuto.com (includes copper crush washer)
Aluminum Foil: On hand in the kitchen
Crescent wrench to start drain plug install: on hand
Simple Green: On hand
Paper towels: On hand
Old Newspaper: On hand

Police Officer: Thumbs Up

I drove The D to work last Friday. While sitting at a stoplight, a police officer heading in the opposite direction drives by, looks me in the eye, and gives me a thumbs up. How about that? Maybe the Police Officers in my town are nicer than others (They’ve waved to me during my morning run). But seriously, when is the last time a cop showed his approval for your car?

Door Launchers!

One of the coolest features of the DeLorean is the gullwing doors that rise effortlessly. With most modern cars, you get remote keyless entry things making it easy to unlock, lock, and even start your car. DeLorean Parts Northwest has taken keyless entry a step farther, and offers door launching! To me, being able to lock, unlock, and launch your doors remotely greatly adds to the “wow” factor with the car.

I chose the Basic Remote Door Opening System. I skipped the other available options, including remote start, trunk release, and alarm in favor of keeping it simple and inexpensive. I read through the directions, and without any prior knowledge of the DeLoreans doors and wiring, I knew this would take some time. I also decided to attempt this project without reviewing the workshop manual (I don’t own it yet). Against recommendations, I tried using cheap wire crimpers. I couldn’t find a good set anywhere! After my first few poorly done crimps, I switched over to vice grips. Not pretty, but they did the job. I also didn’t use a multimeter. To find the wire that goes to each door, I used a length of scrap wire, a taillight bulb, and a 9 volt battery creating a simple circuit.

I planned to photograph everything during my installation since I wasn’t impressed with the photos that came in the instructions. However, as I worked through the installation, I realized there isn’t much to photograph. So here are some installation tips that I came up with for anyone else attempting this project:

-Read the instructions. Every page. Read them over again, at least twenty times. Sleep on them, letting them absorb into your brain through osmosis. Then read them again.

-Make copies of the directions. Only one cut out template is included, and you have two doors. Also, the paper can get dirty/greasy/grimy/torn while working on your cars.

-Get familiar with your electrical compartment (http://dmctalk.com/showthread.php?t=5133)

-Get some good wire crimpers. Not the cheapo ones that most stores sell.

-Center punch before drilling! Drilling into metal isn’t easy, and your bit will slide around! The drilling needs to be precise.

 -Use wiring option 1A
*Cut the wire on the door side of the connector instead of prying it out. The wire wasn’t prying out easily, and I didn’t want to damage the 25 year old plastic connector.

-Use blue colored wire from the doors to the electrical compartment. They will match the wires that connect to the relays.

-Label all your wires and relays. Differentiate your right and left doors. (I still haven’t done this)

-Bend the end of the rod on the actuator side so the rod won’t slide out (shown below, thanks Ken K!)

-Go one step at a time, checking your work. Don’t do everything at once.

I installed everything, and my driver’s door didn’t release. Passenger door works maybe 75% of the time. My driver’s door was also not locking and unlocking in harmony with the passenger door. I found the link rod that connects to the interior lock switch was bent, hitting the lower door panel. I bent it back into shape using the passenger door as a template. I’m happy to say I solved that problem on my own!

Ken K found that the door seals need to be lubricated so that the doors will release cleanly. He also found I needed to bend the end of the link rod on the actuator side even more than I had:

My driver’s door still only release 5% of the time. Possibly because the door seal looks like it was installed out of place compared the passenger side:


Driver’s side


Passenger side

My electrical compartment is a rat’s nest now. I have no idea how to straighten this up. The previously added relays the door lock actuators (which replace the solenoids), the newly added relays from the door launch actuators, and the keyless entry unit for the door launchers really fill the compartment:

Oh well, at least I lock, unlock, and sometimes open the door for my passenger. I might look into adding the trunk release someday, which would be nice in case I ever break my trunk release cable.

Supplies/Costs:

(Blue) 7 Butt Splice wire connectors: $0.99 at Home Depot
(Blue) 16 Gauge Automotive wire: $5.89 at Autozone
K2100DP-B Wings-A-LoftT Basic Remote Door Opening System: $199.95 at http://www.delorean-parts.com

Cooling System Self Bleeder Kit

My car had been running hot, possibly because of trapped air in the cooling system that could prevent the fans from coming on. I’d previously bled my coolant, but I must not have gotten all the air out of the system. I’d seen many owners describe the usefulness of a self-bleeding kit, so I decided I needed one. However, my car was at Ken’s shop during the month of June, and he flushed and refilled the coolant. He was able to get all the air out.

I ordered a self bleeder, but I didn’t get it in time before my car went back to Ken’s shop. I figured I’d try installing it myself.

One of the first steps: Drain the cooling system.

Nope, sorry. The car is running great now, and I want to leave the cooling system alone for 1 to 2 driving seasons. For now, the kit will sit on my garage shelf.

Cost:

K1012DP-A Wings-B-Cool™ Cooling System Self-Bleeder Kit: $29.95
Shipping: Domestic 2-3 Days $7.00
from DeLorean Parts Northwest, LLC

Whole lot of maintenance…

The car wasn’t running smoothly, and had stalled on me several times. I thought this might be because of a loose vacuum connection on the delay valve. I also had transmission fluid leaking out. I would find out later that I probably overcompensated, and added too much fluid back, which made the leak seem even worse. I decided I had to get the car looked at.

On Monday June 11th, I drove the car to work. I left work early to head out to DMC (Midwest). The car was running very warm. Once I got off I-90, I decided to stop for gas. Filled up the tank, attempted to start the car, nothing. It just cranked and cranked. Walked around back, and there’s a puddle of coolant under my engine. $H1T!

Called Ken, he had me try the Hot Start Quick Fix (which I now understand, but didn’t at the time). I probably failed to do this properly. And during my time trying to start the car, the starter decided to “stick” and just keep cranking even after I took the key out of the ignition. Panick set in, since I figured I’d drain the battery. It’s warm out, and I’m sweating bullets while wearing my good work clothes. While troubleshooting, people decide to come over and ask me questions: “Is this a DeLorean?” Not now!!!!

Disconnected the battery, reconnected it, but it still cranked. Called DMC (Midwest), and they had me change the relay for the starter. No more cranking. Tried the hot start quick fix again, and the car started! Went into the gas station, bought a bottle of water, and added some to the coolant.

Go to DMC (Midwest) and left the car there over night. In the morning, I was emailed the diagnosis:

Missing Transmission dipstick bracket
Need two vacuum hoses
Front main seal leaking (again?)
Bad RPM Relay (Explains the stalling)
Other bad relays
Wrong coolant bottle cap
Possible bad accumulator
Other smaller issues

To my surprise, Ken came and picked up the car. He did all the work, and even worked on my attempted door launchers install. I didn’t end up needing a new accumulator. Since Ken was really great about everything, I didn’t want to trouble him with getting the car back. I decided I’d go pick up the car. On Sunday June 24th, with the help of my girlfriend, we drove down in my daily driver (2004 Dodge Stratus Coupe), and drove back separate. Ken recommended I add a bottle of fuel injector cleaner on my next refill. After a few tanks of gas between cars, we got back home without any problems. I’m proud to say the car now drives better than ever.

Ken’s work:

Flush coolant
Install new Stainless water bottle and cap
New front main seal
Door lock adjustments
Replace some relays
Install transmission dipstick bracket
Install/replace two vacuum hoses
Test AC
Other small stuff

Costs:

Stainless Coolant Tank: $151 from SpecialTAuto.com
$3? Fuel Injector Cleaner from Meijer
Couple tanks of gas
Other costs withheld