Cooling Fan Fix

My cooling fans failed on me while driving in a parade last year. Luckily I was able to exit the parade before the engine got too hot.

After troubleshooting the circuit with my test light and the wiring diagram (found here) I found the culprit – a bad changeover relay.

Luckily I have a few on hand, and was able to update it to a 30/40.

Costs:

None!

New Blower Motor

My blower motor was horrendously loud and didn’t always work on the low speed. It also has lots of corrosion in it. I bought a replacement, and finally found time to install it. I’m happy to report the new motor is quieter and works on all speeds.

Tools used:

  • Short ratcheting driver
  • 9/32 bit

Removing the old fan:


found a stray locking nut:

Corrosion:

New, installed:

Costs:

Item Purchase Date Vendor

Unit Cost

Cost

Shipping

Tax

Total

Four Seasons/Trumark 35582 Blower Motor without Wheel

10/24/2018

Amazon.com $ 33.64 $ 33.64 $ – $ 2.10 $ 35.74

New Brake Hoses

Two years ago, a fellow Delorean owner had one of the original brake hoses fail. The hose was acting as a check valve, so when the brakes were applied, the caliper would not retract. I helped the owner replace his front hoses to fix this issue. I had also read about other problems with the original brake hoses. Looking to avoid any problems, and desiring the firmest brake pedal possible, I decided to replace my original brake hoses.

My car club’s spring tech session was hosted at a local repair shop, where we had a car lift available. This was my best opportunity to get all four of hoses replaced.

Disconnecting and re-connecting the hoses on an automatic transmission car for the back wheels is a major PITA. The transmission being in the way makes access very difficult. Being at a repair shop, I could borrow the metric crowfoot flare nut wrenches and extensions needed.

I didn’t get many pictures because I was focused finishing before we had to leave the shop.

New Hoses:

Installed:

Old hoses:

After getting everything installed, and bleeding the brakes, I found brake pedal was still soft. At home, I made sure all the connections were tight, bought some more brake fluid, and bled them again. This time the brake pedal is the firmest it’s ever been!

Costs:

Item Purchase Date Vendor

Quantity

Unit Cost

Cost

Shipping

Tax

Total

Castrol 12614 Dot 4 Synthetic Brake Fluid

5/17/2018

Sparomobile

1

$ 15.95

$ 15.95

$ –

$ 1.27

$ 17.22

Flexible Brake Line Kit Stainless

3/4/2018

DeloreanIndustries.com

1

$ 129.95

$ 129.95

$ –

$ –

$ 129.95

Castrol 12614 Dot 4 Synthetic Brake Fluid

5/21/2018

Amazon.com

1

$ 13.95

$ 13.95

$ –

$ –

$ 13.95

Total

$ 161.12

New Transmission Filter, New Pan Gasket, Coolant Flush

Automatic Transmission filters have not been available for many years. The only options were:

  • Find an NOS filter
  • Cut apart a used filter, replace the filter material, and weld or use aluminum tape to seal it back up
  • Don’t use a filter

…until now! One brave individual took up the cause, and found a company to reproduce them! After buying one, two years ago, I finally got around to replacing it. Draining the ATF:

I tried getting the pan off without disturbing the coolant system, but there was no wiggle room. Oh well, the car could use a coolant flush anyway.

Looks like someone used the cut, replace, and weld method on my existing filter:

There was a decent amount of material on the magnet:

Cleaning the pan:

I liked the quality of the new filters so much, I bought two extra:

New filter installed:

I’m interested in getting rid of any ATF leaks, so I bought the silicone transmission pan gasket offered at DPI:

The bolts I had for the transmission pan started to spin while torqueing them. The new gasket is thicker than the previous one. After some panic, purchasing and installing longer bolts solved the problem.

Time to refill the trans:

Bleeding the coolant, and looking for leaks! Ready to be back on the road after 5 months of winter!

It still leaks ATF. It will always leak ATF:

Costs:

Item Purchase Date Vendor

Qty

Unit Cost

Cost

Shipping

Tax

Total

Automatic Transmission Filter

9/15/2015

eBay

1

$ 46.99

$ 46.99

$ 3.74

$ –

$ 50.73

Automatic Transmission Filter

10/30/2015

eBay

2

$ 46.99

$ 93.98

$ 7.48

$ –

$ 101.46

1 Gallon Castrol Dex/Merc ATF

4/18/2018

Adavance Auto

1

$ 21.99

$ 21.99

$ –

$ 1.76

$ 23.75

Silicone Transmission Pan Gasket

3/4/2018

DeloreanIndustries.com

1

$ 24.50

$ 24.50

$ –

$ –

$ 24.50

7mm1.00 x 20mm Zinc Class 8.8 Hex Cap Screw

4/6/2018

Menards

10

$ 0.49

$ 4.90

$ –

$ 0.42

$ 5.32

Prestone 50/50 Coolant

4/18/2018

Walmart

1

$ 8.88

$ 8.88

$ –

$ 0.71

$ 9.59

Total

$ 215.35

One Piece Clear Evaporator Drain

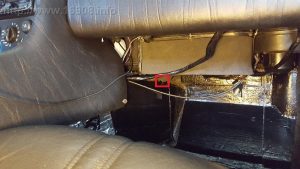
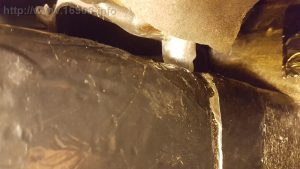
The stock evaporator drain is very prone to clogging with debris. The location makes it also very difficult to clear the clog. It starts in the passenger side of the car, between the evaporator box, and the underbody. It’s a small gap, around 1 inch:
Drain 30 Drain 20

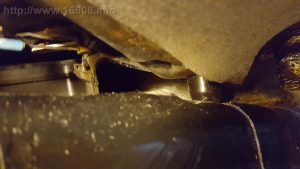
There’s a reducing 90 degree elbow, connected to a short hose that drains into the passenger side front wheel well, right onto the frame:

I previously vacuumed out my cabin air intake, and put a screen over it to keep debris out: https://16908.info/?p=1562

However, my AC drain clogged. I didn’t find this out until a good amount of water built up in my passenger side carpet.

The recommended way to clear the clog is to run some weed-wacker cutting line into the hose, and poke around to free the obstruction. Some people have had luck using a vacuum connected to the drain hose.

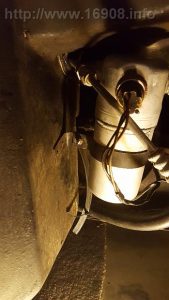
I found the hose was loose, and easily pulled off. I’m not sure it was even connected, and getting it reconnected was going to be very difficult with the AC dryer in the way:
Drain 10

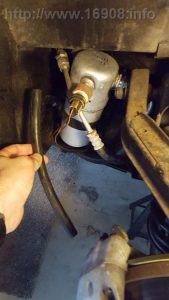
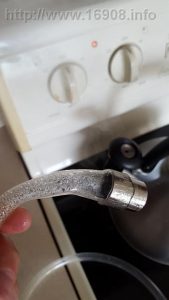
The stock elbow can be cut with a thin saw blade, or gently heated and pried off. The saw method could possibly damage the box or nearby wiring. I opted to use the heat gun, and screwdriver to pry it off. Once I got it off, more water drained onto the cabin floor, and some out onto the ground:
Drain 45

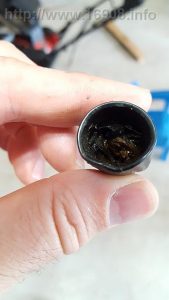
Here’s the reducing elbow, all clogged up:
Drain 35Drain 40

I’ve seen mods where spark plug boots, or coil cover boots are used to make an easily detachable piece to drain water. I decided against any kind elbow, or connection in favor of one single piece of tubing.

I had a length of Chemical-Resistant Clear Tygon tubing left over from building a brake fluid pressure bleeder:
Drain 50

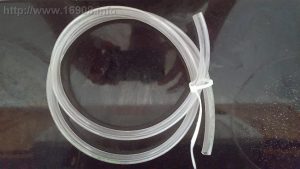
I then boiled some water with a kettle, and held it over the steam for a few seconds. Then I shoved a scissors into the tubing, and opened the scissors to stretch the tubing. After a few tries, I was able to finally get the tubing around a 13mm socket:
Drain 55

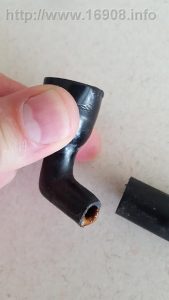
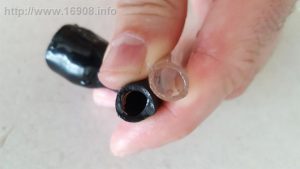
I also used the steam to work the tubing into curve. The stock elbow is a hard 90 degrees, so this gentle curve should reduce clogging. Here’s the old drain, and the new one:
Drain 60

The tubing has a 1/16″ wall thickness, and is very rigid. The inner diameter is 5/16″ and appears larger than the stock elbow:
Drain 90

Now I worked the tubing into the hole in the underbody, and got it out into the wheel well:
Drain 65

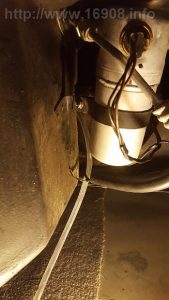
After some twisting, I got it into position, and onto the evaporator drain:
Drain 61

Blowing air through the tube was easy, which confirmed there were no kinks. Now I angled it down, below, and away from the frame. A zip tie secured it:
Drain 70

Whenever I vacuum my interior, I’ll also attach it to the drain hose to suck out any debris which may have found its way into the hose. Hopefully this will keep the drain clog free, and my carpet dry.

To summarize, here’s the benefits of this mod:

  • Clear tubing allows a clog to be seen
  • longer tubing allows water to drain away from the frame, reducing frame rust
  • Eliminates 90 degree elbow, reducing clogs
  • Larger internal diameter tubing reduces possibility of clogs
  • One piece can’t become disconnected in the wheel well
  • Easier to vacuum or snake out debris
  • No need to cut or modify the underbody

Tools:

  • Heat Gun
  • Long flat blade screw driver
  • Scissors
  • 13mm socket
  • Tea Kettle

Costs:

Item Vendor

Quantity

Unit Cost

Cost

Chemical-Resistant Clear Tygon Tubing 5/16″ ID, 7/16″ OD, 1/16″ Wall Thickness, 5 ft. Length McMaster-Carr

1

$ 11.75

On Hand

Latch Maintenance, Modification

I previously had adjusted my latches, performed the “wedgectomy,” and lubricated them generously with white lithium grease:

https://16908.info/?p=2422

Once again, the latches jammed. Removing the top door panel, and removing the latch rods with your bare hands while trapped in the car isn’t fun. I then found this post on DMCTalk:

http://dmctalk.org/showthread.php?12682-door-latch-adjustment-problem&p=182992&viewfull=1#post182992

…which basically means my lithium grease and any other previously used lubricants could have gummed up the latches. So once again, I decided to remove all the latches. I cleaned and degreased them with brake cleaner, my air compressor with a blow gun, and dozens of paper towels. Before re-installing them, I chose to change the “lock linkages” in each door to “lock linkage.” I eliminated the lock linkage on the front of each door. Having two latches means they must be in sync for both opening and unlocking. One lock obviously means there is nothing to sync, which is much easier to setup and maintain. Some people have successfully disconnected their front locks, so the door only locks on the rear latches. The only danger is you might drive over a bump, and the lock might engage. Once engaged, and with no way to unlock the front latch, this will really make getting out of the car a challenge. So I came up with this modification:

LockUnlock

This is the latch, and the arm, that moves back and forth between lock and unlock. Simply drill a small hole in the latch, and wrap some wire around the arm and the latch to secure it. The wire won’t interfere with the latch.
DSC_0029
The reverse side of the latch. You can see the wire doesn’t interfere
DSC_0033

Presto! The latch should never lock, but can easily be converted back to a locking latch.

You can now remove the lock rod that goes to the forward latch. I had to cut and retained half of my lock rod since it is needed for my aftermarket door lock actuators:
DSC_0028 (2)  DSC_0028 (4)

This time around, I lubricated the latches with WD-40. Once reinstalled, I then performed the Door Lock and Latch Adjustment process. After that, comes testing everything! Test the exterior door handles, interior door handles, exterior locks, interior locks, and in my case, remote locks and remote door launchers. Be sure to test it with the door’s plastic membrane in place to see if it interferes with anything.

In my case, everything is working correctly. Time to reinstall the door panels again. Hopefully they’ll stay installed for many years to come.

New Front Wheel Bearings

At DCS 2014 in Dayton, OH, my front right wheel bearing started making groaning noises at high speeds.

I had to rent a puller set and spindle nut socket set from Advance Auto Parts (fully refundable).
Getting the spindle nuts off was easy. I used a breaker bar, and simply lowered the car near the floor, with the weight of the car pressing on the breaker bar:
20150111_132128
Next, I use a pick tool to remove D Washer:
20150111_133504 20150111_133625
Then used a puller to pull off the bearing, hub and rotor:
20150122_204849
The bearings came apart during removal, which is normal:
20150111_141645 20150111_14164920150122_204908
Then, unbolt the rotor from the hubs, and separate them. Sorry, no pictures.

Removing the old bearings and pressing the new bearings into the hubs was going to be a challenge. Instead of having my new bearings shipped, I visited the DMC Midwest shop with the hubs. I purchased the new bearings, and they were able to press them into my hubs.

DMC Midwest suggested I should have blasted and painted the hubs while the bearings were out. Well I didn’t have time for that, so instead I taped them up, and painted them with the new bearings in place:
20150211_203246DSC_0704

I also wire brushed off the undercoating from the brake dust shields, and painted them with rustoleum metallic paint, then a coat of Krylon Metals Gold paint:
DSC_0705 DSC_0706
Doing this job in the winter time helps. My car is left in a cold garage, while I left the rotor and hub in my warm house. Installation is easier with the cold spindle slightly contracted. Mounted, spindle nut installed, and torqued:
DSC_0707 DSC_0708

I’ve driven a few hundred miles on them in 2015, and the groaning noises are gone.

Costs:

Item Vendor

Quantity

Unit Cost

Cost

Wheel Bearing DMC Midwest

2

$ 19.94

$ 39.88

Press in Wheel Bearings DMC Midwest

1


Withheld 

Bulldog Adhesion Promoter

On Hand

Rustoleum Primer

On Hand

Rustoleum Metallic Paint

On Hand

Krylon Metals (Gold) Paint

On Hand

Painted License Plate Bezel

My bezel was flat and dull looking:
DSC_0243
Painting with SEM Trim Black Gloss:
20140518_215146
Painted:
DSC_0242
I also painted the screws with some Rustoleum Black Spray paint.
20140522_193749

Costs:

Item Vendor

Quantity

Unit Cost

Cost

Shipping

Tax

Total

SMM-39063 SEM Paint, Trim, Gloss Black, Aerosol, 12 oz. Summit Racing

1

$11.97

$11.97

On Hand

$0.00

$11.97

Rustoleum Black Spray Paint On Hand

1

On Hand

On Hand

Re-sealed, Painted Spare Tire

I previously replaced the rubber on my spare tire: https://16908.info/?p=1136

The tire wasn’t holding air, and the tire was loose at the bead. I brought it back to Discount Tire, and they re-sealed it with bead sealer. They even did it for free!

DSC_0272

I then cleaned the rim with Simple Green, roughed it up with some steel wool, vacuumed it, and cleaned it with rubbing alcohol:

DSC_0274

Then I prepped it with two light coats of Bulldog Adhesion Promoter, and painted it with Rustoleum High Performance Wheel Paint:

DSC_0275

Finally, tire gloss:
DSC_0276

I checked the tire pressure. 60psi. Ready to go, but hopefully it stays in the trunk.
DSC_0285 DSC_0287

Costs:
Re-Seal Tire @ Discount Tire: Free!
Simple Green: On Hand
Steel Wool: On Hand
Rubbing alcohol: On Hand
Bulldog Adhesion Promoter: On Hand
Tire Gloss: On Hand
Rustoleum High Performance Wheel Paint: $6.00?